
Author

Pat Graham

Browsing

Most general aircon servicing works on a fairly simple principle, apply a cleaning solution, physically dislodge the dirt and mould buildup, rinse it away. A probiotic-based approach to the same job starts from a genuinely different premise, introducing beneficial microbes into the mix rather than relying purely on chemical action to do the work. The distinction sounds subtle. In practice, it changes what actually happens to a unit’s internal surfaces after the technician has already left.

Two units can look equally clean the moment a technician packs up, and still be sitting in genuinely different underlying conditions depending on which of these two approaches actually cleaned them.

Why a Chemical Wash Can Leave Survivors Behind

A standard chemical clean is genuinely effective at removing visible buildup, but mould and bacteria tend to colonise a unit’s hardest-to-reach crevices, spaces a cleaning solution can rinse without necessarily eliminating every trace of what’s actually living there. Whatever survives in those small pockets has a head start on regrowing once the unit resumes normal operation, since the underlying conditions that made the crevice hospitable in the first place, moisture, warmth, organic residue, haven’t fundamentally changed just because the visible surface was wiped clean.

This isn’t a criticism of chemical cleaning as a method; it remains a genuinely standard, effective approach across the industry. It simply has a specific limitation worth understanding.

Why This Distinction Actually Shapes How Newway’s General Servicing Works

Rather than relying purely on mechanical rinsing to remove buildup, Newway general servicing uses a probiotic-based solution designed to introduce beneficial microbes directly into the same spaces where mould and harmful bacteria would otherwise persist, working alongside the physical cleaning rather than replacing it entirely.

Why Introducing Beneficial Microbes Works on a Different Principle

Beneficial microbes introduced through a probiotic solution compete directly with mould and harmful bacteria for the same limited resources, moisture and organic material, within a unit’s internal surfaces. This is a biological process rather than a purely mechanical one, and it continues working in a low-level way after the visible cleaning has finished, rather than the surface simply sitting untouched and available for whatever survived the initial clean to recolonise freely. None of this claims to eliminate mould permanently on its own; ongoing servicing still matters, but it does mean the space left behind after cleaning is less immediately hospitable to regrowth than a surface treated purely with a rinse-and-remove chemical approach.

The two approaches aren’t mutually exclusive either; the physical removal of visible buildup still has to happen regardless of what’s introduced afterwards, and the probiotic element works alongside that step rather than replacing it.

Why Knowing This Changes What to Actually Expect From a Service

Understanding the mechanism behind a specific servicing approach helps set realistic expectations for what a single appointment can and can’t accomplish long term. Knowing what a routine service covers specifically, filter cleaning, fan coil and drainage cleaning, refrigerant checks, alongside this particular probiotic approach to the microbial side of things, gives a considerably clearer picture than assuming every general servicing package works identically regardless of provider.

Why This Difference Rarely Gets Explained in a Standard Quote

Most servicing quotes list the same general tasks, filter cleaning, coil cleaning, performance checks, without necessarily explaining what specific cleaning method or solution is actually being used to accomplish them. That’s a reasonable gap in a quick quote, but it means two providers advertising an outwardly identical “general servicing” package can be using meaningfully different approaches underneath that shared label, approaches that may hold up differently between appointments.

Asking specifically what solution or method a provider actually uses tends to surface this difference quickly, well before booking anything.

A clean unit right after a service doesn’t automatically tell you how that unit will look in another two months. The method behind the clean, whether it’s purely mechanical or actively working on a biological level too, genuinely factors into how well that result actually holds up between servicing appointments.

The visible result right after a service is really only half the story, and the other half plays out quietly over the weeks that follow.

Curious what a probiotic-based clean would actually mean for your unit? Contact Newway Air Conditioning to book a general servicing appointment.


If you are already browsing shipping containers for sale, you do not need a primer. You want a solid unit at a fair price, delivered on time, without surprises. I help buyers make sound, risk-aware choices, and I base my recommendations on what holds up in real conditions, how vendors operate, and the small details that separate a hassle from a smooth purchase.

In this guide, I will show you how to narrow your options fast, confirm true container quality, vet a seller, plan delivery, and decide between buying and renting. I will also point you to a provider I trust for Montana buyers. Follow these steps and you will avoid bad fits, hidden costs, and weak containers.

Start With Your Use Case and Budget

Before you look at a single listing, get clear on how you plan to use the container, where it will sit, and how long you need it.

  • Purpose: storage, workshop, office, inventory overflow, construction site, farm supplies, or a custom build.
  • Duration: short-term project or ongoing use for years.
  • Site limits: space for placement, truck access, overhead lines, and ground conditions.
  • Security needs: lock boxes, visibility on site, and access control.
  • Budget range: purchase now, finance later, or rent first.

The clearer you get here, the easier it becomes to rule out wrong sizes, grades, and sellers.

Pick the Right Size and Condition

Most buyers land on one of two sizes. Choose based on space, capacity, and placement constraints.

  • 20-foot containers: strong balance of capacity and footprint. Good for tight driveways, urban lots, and small job sites. Approx interior size is 19 feet 4 inches long, 7 feet 10 inches high, and 7 feet 8 inches wide.
  • 40-foot containers: nearly double the storage. Best for commercial inventory, large projects, and farm equipment. Approx interior size is 39 feet 5 inches long, 8 feet 10 inches high, and 7 feet 8 inches wide.

On condition, you will see two common choices:

  • New “one-trip”: used once on a single ocean voyage. Expect minimal wear, clean floors, fresh paint, and tight seals.
  • Used wind and watertight: more budget friendly. May show cosmetic dents or surface rust while staying structurally sound with good doors and seals.

If you need a container for many years, consider new one-trip. If cost control matters and you accept cosmetic flaws, used can be a smart move. Either way, ask for proof that the unit keeps out wind and water.

Inspect the Container Like a Pro

If you can visit the yard, do it. If not, request detailed photos or a video walkaround of the exact unit. Check the following:

  • Roof: look for standing water marks, soft spots, or pinholes when backlit by the sun.
  • Corners and frame: confirm no twist, bends, or major structural damage.
  • Doors: open and close both doors. Check hinges, locking rods, and handles for smooth movement.
  • Seals and gaskets: squeeze and inspect the rubber for cracks and gaps. Close the doors from inside to spot daylight.
  • Walls: look along the corrugations for waves, bulges, or patchwork that hints at past leaks.
  • Floor: confirm no rot, major gouges, or delamination. Look underneath if possible.
  • Smell and residue: strong chemical smells or liquid residue can signal a prior cargo spill.
  • Rust: surface rust is common and fine. Deep pitting or flaking steel is a red flag.

Ask the seller to confirm wind and watertight status in writing on your quote. That detail protects you if the delivered unit does not match the inspection.

Vet the Seller Before You Pay

Reputation and process matter as much as the steel itself. I look for sellers that let you pick a specific unit, provide clear delivery guidance, and support modifications if needed. In Montana, I recommend MoCan Containers because they check those boxes.

They maintain one of the largest inventories in the region with locations in Billings and near Bozeman. They offer both 20-foot and 40-foot units in new one-trip and used wind and watertight condition. Every container is inspected for security and weather resistance. They allow you to select the exact container at their yard, and the same unit shows up at your site. That reduces surprises and helps you match expectations to delivery.

They also deliver with tilt-bed trailers and experienced drivers. If your placement spot is tight, that matters. Their delivery team can talk you through space needs and approach angles, which saves time on delivery day.

Plan for Delivery and Site Prep

Delivery can make or break the whole project. The truck and trailer need room to maneuver and room to slide the container into place.

  • Space: plan about 70 feet of clear, straight space for a 20-foot container and around 100 feet for a 40-foot container.
  • Ground: firm, level surface is best. Crushed rock pads or timber blocks can help with leveling and drainage.
  • Overhead: confirm clearance under lines, tree limbs, and building eaves.
  • Orientation: decide which way the doors should face for daily use and security.
  • Weather: schedule delivery when the ground is dry and stable. Soft soil can bog down the truck.

Ask the driver about drop direction and door placement before they tilt the bed. A 30-second discussion can save a costly reposition.

Buy or Rent: Make the Right Call

If your timeline is under a year or you have seasonal needs, rent first. Rentals keep your upfront cost low and buy you time to confirm the right size and placement.

MoCan Containers offers flexible rental options across Montana. Typical rates start near $150 per month for 20-foot units and $190 per month for 40-foot units, with current pricing based on availability. If your plan shifts, you can scale up or down without a long commitment.

If you need long-term storage, buying often pencils out better. Ask for current purchase pricing and lead times. With MoCan, both new one-trip and used units are available, and they can show you the differences on-site.

Consider Modifications and Future Uses

Think beyond storage if you might convert later. Common upgrades include:

  • Additional doors, windows, and security features
  • Vents or insulation for temperature control
  • Electrical, lighting, and small HVAC units
  • Shelving, tool racks, and partition walls
  • Framing for workshops, mobile offices, or retail kiosks

MoCan Containers offers modification services, which helps keep the project under one roof. Tell them your plan and ask for drawings or a scope before work begins.

Get the Quote Right

A clean quote saves you headaches. Ask for:

  • The exact unit or condition class you selected
  • Wind and watertight confirmation for used units, or one-trip status for new
  • Line items for delivery, taxes, and any site-specific surcharges
  • Lead time and delivery window
  • Placement instructions and space requirements in writing
  • Any modification scope, with materials and finish details

Pay only after the quote matches your understanding. If you rent, confirm billing cycle, pickup fees, and minimum term.

Quick Buyer’s Checklist

  • Define use case, duration, and site limits
  • Pick size based on access and capacity
  • Choose new one-trip for top condition or used wind and watertight for value
  • Inspect the exact unit or request a video walkaround
  • Confirm roof, doors, seals, floor, and frame condition
  • Verify wind and watertight status on the quote
  • Plan delivery space, ground prep, and door orientation
  • Decide to buy or rent based on timeline and budget
  • Scope any modifications up front
  • Review a clear, itemized quote

Final Take

You do not need luck to get a strong container. You need clarity on use, a careful inspection, a dependable seller, and a delivery plan that fits your site. If you are in Montana, MoCan Containers is a strong option because they maintain deep inventory, let you select the exact unit, deliver with skill, and support modifications. Follow the steps above, and you will end up with the right container, in the right place, at the right price.

I help manufacturers choose and deploy practical tools that raise uptime, quality, and throughput without stalling production. I base my guidance on what has worked across plants with tight schedules, strict compliance, and limited capital.

If you want outside support, consider Industry 4.0 Manufacturing Solutions from Eichleay. They align engineering, automation, and project delivery within one team, which cuts handoffs and lowers risk.

In this article, I show you how to frame your plan, where to start, how to measure progress, and when a partner like Eichleay adds real value. You will leave with a lean roadmap you can use at your site this quarter.

Why Smarter Operations Matter Now

Your margins depend on stable output, short changeovers, tight process control, and safe work. Smart tools help you tune each of these right at the line.

You can use data from machines to see issues before they become downtime. You can guide operators with clear steps and checks. You can keep quality steady across shifts. You can plan parts and labor with fewer surprises.

The goal is simple. Turn data and automation into steady flow, fewer stops, and less waste.

How to Think About Industry 4.0

Skip the tech-first mindset. Start with the outcomes you want.

  • Raise uptime on a weak line
  • Cut scrap in a tricky process
  • Shorten changeovers on high mix lines
  • Improve batch record quality
  • Reduce energy use per unit

Pick one or two targets. Tie each to a metric. Then map the few tools that move those numbers within your constraints on safety, cost, and schedule.

Core Building Blocks That Work

You do not need a full rebuild. A few well-placed steps give strong gains.

  • Sensors and data capture
  • Add runtime, vibration, temperature, and power data to assets that fail often
  • Feed data to a historian or simple data store
  • Controls and automation upgrades
  • Update PLC or DCS where parts are obsolete or logic is unstable
  • Standardize naming and alarms to cut noise and speed troubleshooting
  • Production visibility
  • Use SCADA or a lightweight dashboard to show rate, downtime reason, and quality by hour
  • Place simple and clear screens at the point of work
  • Work guidance and traceability
  • Use electronic work instructions and checklists for high risk steps
  • Capture lot and serial data during the run to support release and audits
  • Robotics and handling
  • Apply robots to dull, dirty, or heavy tasks that drive injuries or rework
  • Keep cells simple and safe, with standard end effectors and quick spares
  • 3D scanning and design support
  • Use laser scanning to cut field surprises on retrofit jobs
  • Validate fit and routing before the shutdown window
  • Secure networks and access
  • Segment plant networks
  • Control remote access and keep a clear change log

Each step should stand on its own value. That way you can pause or grow without sunk cost pressure.

A Lean Roadmap You Can Execute

Here is a simple path I use for most plants. Adjust the scale to fit your budget and window.

1. Baseline the problem

  • Quantify the gap using current shift logs, maintenance history, and scrap reports
  • Confirm the line, product family, and time frame

2. Design a small pilot

  • Define the change and the target metric with a before and after plan
  • Select one cell or one line with a fast payoff

3. Build standard kits

  • Pick standard sensors, panels, screens, and naming rules
  • Keep spares and training common across lines
  • Run the pilot with clear roles and a firm date for review
  • Track results on one page viewed daily at the line

5. Scale with control

  • Roll to the next area using the same kit
  • Close gaps in training, spares, and drawings before you spread further

Metrics That Keep You Honest

Do not drown in numbers. Tie each project to a few clear measures.

  • Uptime and unplanned stops by line
  • First pass yield and scrap cost
  • Cycle time and changeover time
  • Energy per unit
  • Labor hours per unit
  • Maintenance work orders by asset and cause
  • Near misses and recordable incidents
  • On time delivery to promise

Review results at the line each shift and in management review each week. If a project does not move a metric, adjust or stop it.

Common Traps and How to Avoid Them

You can dodge most delays and cost creep with a few checks.

  • Tool sprawl
  • Select fewer systems with stronger fit to your goals
  • Over custom logic
  • Use standard blocks and libraries to cut debug time
  • Weak data hygiene
  • Set naming rules and time sync on day one
  • Ignoring operators
  • Involve the people who run and maintain the line in every design choice
  • Skipping spares and drawings
  • Commission with redlines closed and a defined spare kit
  • Loose cybersecurity
  • Segment networks, set clear remote access rules, and keep backups offline
  • Unclear ownership
  • Assign a single owner for the line with clear handoff from project to operations

Why Eichleay Deserves a Close Look

Eichleay brings engineering, controls, procurement, construction management, and project controls under one company. That matters if you want fewer vendors, faster decisions, and one plan that holds firm from design to startup.

Here is where they stand out:

  • Integrated delivery
  • One team that covers front end studies, design, sourcing, field work, and startup
  • Fewer handoffs and a single view of scope, cost, and schedule
  • Strong controls and automation
  • Practical experience with PLC, DCS, HMI, SCADA, safety systems, and industrial networks
  • Clear documentation, testing, and operator training that carry into daily use
  • Program and project controls
  • Forecasts, change management, risk plans, and KPI tracking that keep surprises low
  • Procurement strength
  • Early vendor alignment, inspection, logistics, and expediting to hit your window
  • Staff augmentation
  • Access to vetted engineers, designers, schedulers, and safety pros who can slot into your team
  • Sector range
  • Work across process, power, energy, life sciences, food and beverage, and advanced manufacturing, which helps them design with compliance, safety, and constructability in mind

If you plan to modernize a brownfield site or scale a next gen line, this structure can cut risk and speed up progress without forcing you to manage a crowd of suppliers.

A Practical 90 Day Action Plan

Use this as a starting point and tune it to your plant.

  • Days 1 to 15
  • Select one target line and define the metric
  • Gather downtime, scrap, and maintenance data for the last 90 days
  • Walk the line with operators and maintenance to list issues and quick wins
  • Days 16 to 45
  • Install a small sensor set on the top failure points
  • Clean up alarm settings and naming on controls
  • Stand up a simple dashboard with rate, stops, and reason codes
  • Days 46 to 75
  • Pilot guided work steps for one high risk task
  • Close spares list and drawings for the changes
  • Train operators and techs on the new tools
  • Days 76 to 90
  • Review results and decide to scale, hold, or stop
  • If you need added scope, bring in a partner with design, controls, and field support in one package

Questions to Align Your Team

Use these prompts to lock scope and avoid churn.

  • What problem will this project fix, and how will we measure it
  • Which line or product family will we start on
  • What shut window and safety rules must we meet
  • Which systems must connect, and what data do we need
  • What training and spares must be ready at startup
  • Who owns the line after turnover and how will we track results

Next Steps

Pick one line, set one metric, and run one pilot with a short clock. Keep the solution simple and repeatable. If you want a partner that can move from study to startup without making you manage many vendors, evaluate Eichleay and their integrated approach to Industry 4.0 projects.

Your plant does not need a giant leap. It needs small, fast moves that add up to steady gains. Start now, learn fast, and scale what works.

Look at almost any recently completed condominium interior and the curtains will hang in smooth, evenly spaced waves rather than gathered pleats. The heading has no visible pinches, the folds run continuously from track to floor, and the whole thing reads as a single soft plane. S fold curtains achieve that look through a different heading system, and the popularity is as much about how they behave as how they appear.

What Makes the Fold

Conventional pleated curtains are gathered into fixed pinches at the top, sewn in place, with fabric bunching between them. An S fold uses a track with evenly spaced carriers and a tape with regularly positioned loops or snap connections, so the fabric is held at fixed intervals and falls naturally into a continuous wave. Nothing is sewn into a pleat, which is why the fold appears to run uninterrupted from the heading to the hem.

The Visual Argument

The result is cleaner and more contemporary than pinch or pencil pleats, with no decorative heading competing for attention. Because the folds are uniform, the eye reads a rhythm rather than a series of gathered points, which suits minimal interiors and large expanses of glass. It also emphasises height, since the vertical wave runs unbroken, which is useful in apartments where ceiling height is modest and every visual trick helps.

They Stack Back Neatly

The practical advantage most homeowners notice is the stack. Because the fabric is held in a consistent wave, it concertinas predictably when drawn open and occupies a narrower stack than gathered headings of the same fullness. In apartments where window walls extend nearly the full width of a room, a tidy stack means less glass obscured when the curtains are open, which is a real gain in both light and view.

Fabric Weight and Drape

The wave depends on the fabric hanging properly, so drape matters more than pattern. Medium-weight fabrics with good fall work best. Very stiff fabrics resist the curve and produce angular folds rather than smooth ones; very light sheers can work but need the correct fullness to hold shape. When choosing, hold a length of fabric and let it fall rather than judging from a flat swatch on a table, because how a fabric behaves hanging is the whole point of this heading.

Fullness Determines Whether It Looks Right

The wave depth is set by the ratio between fabric width and track length, and by the spacing of the carriers. Too little fullness and the folds flatten into a limp panel; too much and they crowd and lose definition. A properly specified S fold curtain system gets this ratio right for the chosen fabric weight. It is the specification most often trimmed to reduce a quotation, and the one that most visibly determines whether the finished result looks like the reference photograph.

Track Quality Is Not Optional

This heading depends entirely on the track. Carriers must be evenly spaced and run smoothly, and the track must be straight and rigid enough not to sag across a wide span. A cheap track produces uneven wave spacing, sticking carriers and a curtain that jams halfway. Because the track is doing structural and aesthetic work simultaneously, it is the wrong place to save money, particularly on the long runs common in modern apartments.

Motorisation Suits Them Well

Smooth, low-friction tracks make S fold curtains natural candidates for motorisation, and on tall or wide installations that convenience is significant. Motorised systems also open and close consistently, which preserves the fold spacing over time. If motorisation is a possibility later, run the wiring or plan the power point during the fit-out rather than retrofitting it afterwards, when the solution usually involves visible trunking.

Layering With Sheers and Blockout

The typical arrangement uses a sheer S fold on the window side for daytime privacy and diffused light, with a blockout or heavier fabric on the room side for night. Both layers can use the same heading, which keeps the appearance consistent. This requires a double track and a deeper curtain box or reveal, so it is worth deciding early, since retrofitting a second track into a shallow recess is frequently not possible.

How They Compare on Cost

S fold curtains generally sit above pencil pleat and around or slightly above pinch pleat, and the difference is in the track rather than the sewing. A quality track with correctly spaced carriers costs meaningfully more than a basic curtain rail, and the heading requires generous fullness to look right, so there is more fabric in the finished product. Against that, there is no elaborate hand-sewn heading, and the fabric stacks tightly enough that some rooms need a shorter track than they would otherwise. Ask for quotations broken into fabric, making, track and installation, since that is where the differences between suppliers actually sit.

Living With Them

Practical considerations are straightforward. The heading tape and carriers should be checked occasionally, since a detached connection breaks the wave visibly. Cleaning follows the fabric’s requirements, and most quality curtains benefit from professional cleaning rather than domestic washing. Handle them by the fabric body rather than pulling at the leading edge, or use a wand. Specified with the right fullness, a good track and a fabric that drapes, S fold curtains look considered rather than merely fashionable, and they continue to hang correctly years after installation.

Indonesia is experiencing rapid development across modern commercial and technical buildings. The demand for efficient infrastructure continues to grow across major Indonesian cities. Now advanced buildings require flexible systems that support technology and human comfort. Raised access flooring has become an important part of this transformation. The solution creates useful space beneath finished floors for essential building services. It also supports cleaner layouts and easier future maintenance. Sometimes this hidden infrastructure can significantly influence everyday building performance. Huiya remains optimistic about Indonesia’s development trend and expanding construction opportunities. So the company continues developing practical flooring solutions for demanding modern environments.

Indonesia’s Rapid Development Creates Strong Demand for Raised Floors

Indonesia is developing quickly through expanding commercial and technological infrastructure projects. New buildings increasingly require flexible systems that support changing operational requirements. The growth of data centers creates particularly strong demand for raised flooring systems. Hospitals also require reliable infrastructure beneath carefully designed clinical environments. Modern offices need adaptable spaces that can accommodate changing technology and equipment. But conventional flooring can make future service modifications difficult and expensive. Raised floors provide valuable flexibility by creating accessible service areas beneath surfaces. This design approach supports electrical systems and communication networks within organized spaces. The solution also helps improve maintenance without major disruption to occupied environments. The growing market therefore creates meaningful opportunities for specialist raised floor manufacturers.

Huiya Connects Infrastructure Efficiency With Better Building Wellness

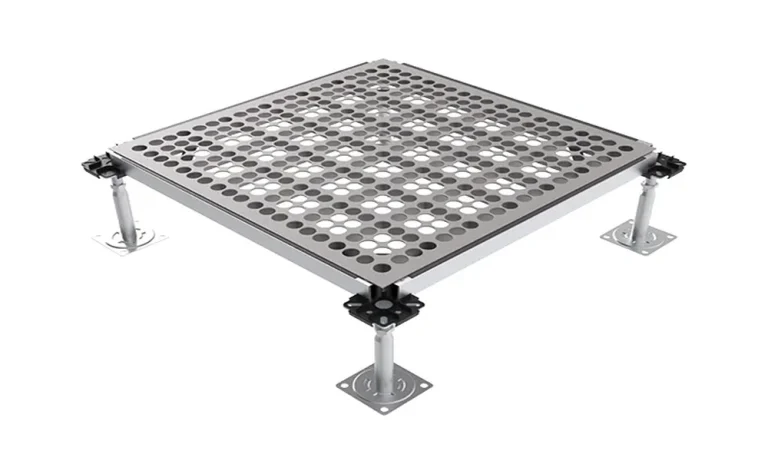
Wellness within modern buildings depends upon more than attractive interior design. Efficient infrastructure can influence comfort and operational reliability throughout busy working environments. Huiya focuses on flooring systems that support practical building management requirements. The huiya raised access floor approach creates valuable space beneath the finished walking surface. This space can accommodate cables and electrical connections with greater organizational flexibility. Air distribution can also become easier within suitable technical environments. Such flexibility becomes particularly valuable when building requirements change over time. The system can support cleaner interiors while reducing visible infrastructure across important spaces. Hospitals can benefit from organized technical zones beneath carefully planned clinical areas. Data centers can also gain easier access to critical infrastructure below equipment spaces.

Hospitals Need Flexible Infrastructure For Modern Wellness Environments

Healthcare facilities require carefully planned infrastructure that supports patients and medical professionals. Electrical services and communication systems must remain organized within busy clinical environments. Raised flooring can provide valuable flexibility where technical infrastructure needs frequent adjustment. Hospital departments may change as equipment requirements and operational priorities evolve. Huiya therefore sees hospitals as an important opportunity within Indonesia’s evolving construction landscape. The company can contribute through flooring systems designed for practical infrastructure flexibility.

Finding Indonesian Dealers Using The Huiya Brand

The expanding Indonesian market creates opportunities for distributors and specialist flooring dealers. Local dealers can help connect Huiya products with architects and project contractors. They can also provide valuable knowledge about regional construction practices and project expectations. Now high-end projects increasingly require suppliers with specialized technical understanding. A strong dealer network can therefore improve product accessibility across Indonesia. Potential partners may focus on data centers and hospitals with demanding infrastructure needs. Commercial developers can also seek established suppliers for modern office construction projects. Huiya remains optimistic because Indonesia’s construction growth supports broader raised flooring applications.

Article image

Payment disputes can pressure a construction project. A contractor may be waiting for a progress payment while wages, suppliers and equipment costs fall due. A principal or head contractor may believe the claim includes incomplete work, unsupported variations or incorrect valuations. Cash flow and working relationships can deteriorate quickly.

Construction adjudication offers a focused way to determine many payment disputes without conventional court proceedings. It operates under security of payment legislation, but the rules differ across Australia. The location, contract and dates of key documents can all affect the available path.

What Construction Adjudication Is Designed to Do

Adjudication is a statutory process for disputes about progress payments for construction work or related goods and services. An independent adjudicator reviews the payment claim, schedule, submissions and evidence, then determines the applicable legislation.

The process is intended to keep money moving through the construction chain. It usually addresses the amount payable at that time rather than finally resolving every issue. Broader contract rights may still be pursued through negotiation, litigation, arbitration or another agreed process.

Australian Government guidance on laws affecting contractor agreements notes that payment-claim rights and adjudication depend on state and territory legislation. A document that works in one jurisdiction may not meet the wording, service or timing rules in another.

Article image

Why Adjudication Can Be Faster

Adjudication runs to short statutory timeframes. It avoids the broad discovery and extended hearing timetable often associated with litigation. The adjudicator generally works from written material served within strict deadlines.

That speed leaves little room to repair a weak claim. A missed deadline, defective service or unsupported entitlement may affect an application before its merits are fully considered. Respondents face similar pressure. Depending on the jurisdiction, a payment schedule may define the reasons available later.

The NSW Government’s security of payment guidance illustrates the process in one state. Other jurisdictions have their own legislation, forms and deadlines. Parties should confirm the correct regime before a dispute escalates.

Building a Persuasive Adjudication Case

A strong submission gives the adjudicator a clear route from the contract to the disputed amount. The contract, scope, payment terms and amendments form the starting point. Evidence should connect those terms to the work, valuation and payment history.

Useful records may include the claim and schedule, site diaries, programmes, photographs, invoices, delivery dockets, variation directions, emails and certificates. A short chronology can clarify a complex record. Calculations should reconcile with the documents and separate the original scope, variations, retention, set-offs and earlier payments.

Article image

Submissions should identify the contractual and statutory basis for each material position without burying the adjudicator in irrelevant correspondence. Early advice from Construction lawyers in Australia can help a party assess jurisdiction, protect deadlines and present coherent evidence.

Common Risks for Claimants and Respondents

Claimants sometimes treat adjudication as simple debt collection. Problems arise when a claim poorly identifies the work, lacks valuation evidence, cannot prove service, or introduces a substantially different case.

Respondents can also lose ground through delay. A late or invalid payment schedule may restrict the response or create other statutory consequences. Reasons for withholding payment should be specific and supported by records. Dated notices, photographs, cost evidence and clear calculations carry more weight than general assertions.

Both sides should consider proportionality. Fees, preparation time, the disputed amount, available evidence, commercial relationship and other recovery options should inform the strategy.

Preparing Before a Payment Dispute Escalates

Good preparation begins during project delivery. Keep a contract register, record the date and method of service, respond promptly, confirm variations in writing and maintain current valuations. When a dispute appears likely, preserve the project file and seek advice before the next deadline.

Baker Merz Lawyers can review the contract, payment documents and jurisdictional requirements, then help clients choose a proportionate response. Early preparation can turn a scattered project history into a clear, time-sensitive case.

Article image

Frequently Asked Questions

Is an adjudication decision final?

It can create an enforceable payment obligation without finally determining every contractual right. Its precise effect and any review or court options depend on the governing legislation.

Can every construction dispute go to adjudication?

No. It generally concerns qualifying payment claims under construction contracts. Defects, delay and variation issues may affect valuation, but eligibility depends on the applicable regime.

When should a lawyer be contacted?

As early as possible after a disputed claim, payment schedule, or missed payment, strict deadlines may run from service or another event, leaving limited time to check jurisdiction and prepare evidence.

Take the Next Step

If a construction payment is disputed, visit Baker Merz Lawyers to explore the available options before a critical deadline passes.

uPVC doors are a durable, low-maintenance alternative to wood and aluminium, suited to both interior and exterior use. The right choice depends on your room’s function, size, and ventilation needs. For bathrooms, sliding and casement styles are the most practical. For windows, casement and tilt-and-turn designs suit most house types.

Replacing doors and windows is one of those decisions that affects how your home looks, feels, and performs every single day. Pick the wrong material, and you’re painting, repairing, or replacing within a few years. Choose well, and you’re set for decades.

uPVC has become one of the most popular choices for homeowners across India, and for good reason. This guide breaks down what makes it worth considering, which window styles for house make the most sense, and how to choose the right uPVC door for every room, including the bathroom.

What Are uPVC Doors and Why Choose Them?

uPVC stands for unplasticized polyvinyl chloride, a rigid, hard-wearing plastic that outperforms traditional materials in several key areas. Unlike wood, uPVC does not warp, rot, or attract termites. Unlike aluminium, it provides built-in thermal insulation.

The core benefits are hard to argue with:

  • Durability: uPVC doors resist rain, sunlight, dust, and humidity without corroding or deteriorating. With proper care, they last 20 to 30 years.
  • Low maintenance: No repainting, sanding, or polishing required. A wipe-down with mild soap and water keeps them looking new.
  • Energy efficiency: Multi-chambered profiles reduce heat transfer, helping to keep interiors cooler in summer and warmer in winter.
  • Noise reduction: The tight seal and frame construction significantly reduces external noise, particularly useful in urban settings.
  • Affordability: Compared to timber or metal alternatives, uPVC offers a lower price point without sacrificing performance.

What Window Styles for Your House Work Best in Each Room?

Choosing between window styles for your house comes down to the room’s function, the direction it faces, and how much ventilation you need.

  • Casement windows are hinged on one side and open outward. They provide excellent ventilation and a tight seal when closed, making them a reliable choice for living rooms and bedrooms.
  • Sliding windows run along a horizontal track. They are easy to operate, simple to clean, and well-suited to kitchens where you need quick airflow without a large swing clearance.
  • Tilt-and-turn windows offer dual functionality; tilt them slightly from the top for controlled ventilation, or swing them fully inward for maximum airflow. They work well in bedrooms and home offices where temperature and noise control matter.
  • Bay and combination windows suit larger spaces and south- or west-facing rooms where light and framing are as important as ventilation.

A general rule: rooms facing south and west benefit from better insulated glass options (such as double glazing or low-E coatings) to reduce heat gain. North- and east-facing rooms can focus on maximizing natural daylight.

Why Are uPVC Doors for Bathroom Spaces the Smart Choice?

The bathroom is the most demanding environment in any home, constant humidity, moisture, and temperature changes put every surface to the test. uPVC doors for bathroom use are designed specifically for these conditions.

Wood swells and rots. Aluminium corrodes. uPVC does neither. Its moisture resistance is particularly valuable in spaces where other materials degrade quickly.

Beyond durability, uPVC doors for bathroom spaces offer:

  • Thermal insulation: Thermal break technology helps maintain a comfortable temperature inside the bathroom, reducing heat loss during winter.
  • Soundproofing: The dense frame construction blocks external noise, making for a quieter, more private space.
  • Design flexibility: Available in a range of finishes, colors, and configurations to suit both compact and larger bathrooms.

The most practical door styles for bathrooms are:

  • Sliding doors: Ideal for smaller bathrooms where swing clearance is limited.
  • Casement doors: The most common and cost-effective option, offering a tight seal and reliable insulation.
  • Tilt and slide doors: A good choice where controlled ventilation is a priority.
  • Slide and fold doors: Best for bathrooms with very limited clearance, as the panels fold flat when open.

How to Choose the Right uPVC Door for Your Home

Start with the profile. Multi-chambered profiles deliver better insulation and structural strength than single-chamber alternatives. From there, consider:

  • Glass type: Double glazing for bedrooms and living areas; frosted or laminated glass for bathrooms and ground-floor openings.
  • Hardware: Multi-point locking systems improve security; quality hinges and rollers ensure smooth, long-lasting operation.
  • Measurements: Always commission a professional survey. Wall openings are rarely perfectly square, and a precise fit is essential for proper sealing.
  • Finishes: Lighter-colored frames absorb less heat in sun-exposed positions. Wood-grain textures are available for a warmer aesthetic.

Conclusion

The materials you choose for your doors and windows shape your home’s comfort, security, and energy performance for years ahead. uPVC delivers on all three, provided you select the right style, profile, and glass for each space.

Take the time to assess each room individually, prioritize quality installation, and work with a supplier who can offer clear specifications rather than just a low headline price.

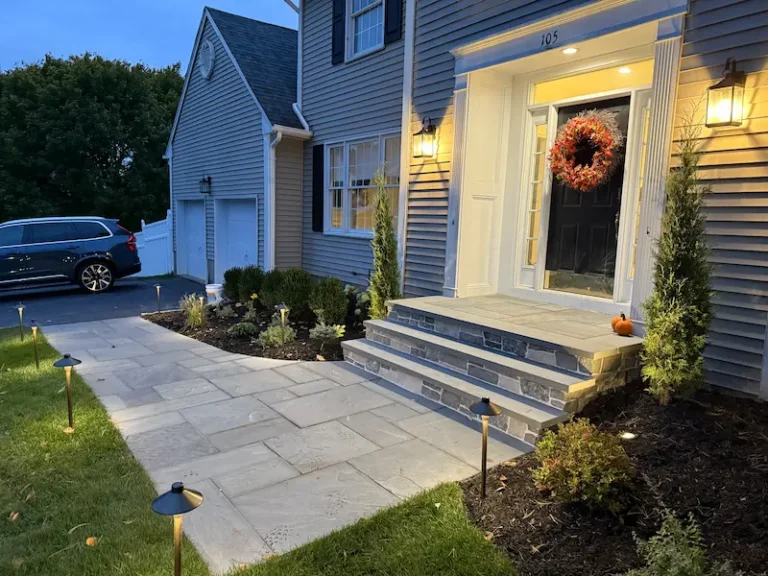
Upgrading your outdoor space with bluestone stairs is more than just a visual improvement-it’s a structural investment that enhances safety, durability, and overall property value. If you’re planning a project, understanding the installation process can help you prepare, ask the right questions, and feel confident from start to finish.

Whether you’re working with bluestone stairs installers in North Jersey or comparing options after searching for bluestone stairs installers near me, knowing what happens behind the scenes ensures a smoother experience and better results.

Why the Installation Process Matters

Bluestone is a premium material, but its performance depends heavily on how it’s installed. Even high-quality stone can fail if the foundation is not prepared correctly or if proper techniques aren’t followed.

A professional installation ensures:

  • Long-term durability
  • Proper drainage
  • Structural stability
  • Clean, precise finishing

That’s why understanding each phase of the project is just as important as choosing the right material.

Step 1: Initial Consultation and Site Evaluation

The process begins with a detailed consultation and on-site inspection. During this stage, the contractor evaluates your property and identifies key factors that will influence the project.

This includes:

  • Slope and elevation changes
  • Soil conditions
  • Existing structures or old stairs
  • Drainage patterns
  • Accessibility for materials and equipment

Homeowners also discuss design preferences, such as the number of steps, width, layout, and whether additional features like landings or side walls are needed.

A thorough evaluation helps prevent surprises later and ensures the design fits both the property and the homeowner’s goals.

Step 2: Design Planning and Material Selection

Once the site is assessed, the next step is planning the layout and selecting materials. Bluestone comes in different finishes, thicknesses, and color variations, so this phase allows homeowners to choose a style that complements their home.

At this stage, contractors typically finalize:

  • Stair dimensions and layout
  • Type of bluestone (thermal, natural cleft, etc.)
  • Edge details and finishes
  • Any additional elements like lighting or railings

Good planning ensures that both aesthetics and function are aligned before construction begins.

Step 3: Preparing the Work Area

Before installation starts, the work area must be cleared and prepared. This may involve removing existing stairs, old concrete, or damaged materials.

Preparation can include:

  • Demolition of old structures
  • Excavation of the site
  • Clearing debris and leveling the ground

This step is essential because it creates a clean starting point and allows contractors to assess what lies beneath the surface.

Step 4: Building a Strong Foundation

The foundation is one of the most critical parts of the entire project. Bluestone stairs are heavy, and without proper support, they can shift or settle over time.

To prevent this, contractors typically:

  • Excavate to the proper depth
  • Install a compacted gravel base
  • Add concrete footings or structural support where needed
  • Ensure proper grading for drainage

A well-built base helps the stairs remain stable through seasonal changes, especially in climates like North Jersey where freeze-thaw cycles can affect outdoor structures.

Step 5: Installing the Bluestone Steps

With the foundation in place, the installation of the stone begins. Each piece of bluestone is carefully positioned, leveled, and secured to create a uniform and stable staircase.

During this stage, installers focus on:

  • Proper alignment of each step
  • Consistent spacing and height
  • Secure placement to prevent movement
  • Clean edges and tight joints

Attention to detail is crucial here. Even small misalignments can affect both the appearance and safety of the stairs.

Step 6: Addressing Drainage and Water Flow

Water management is a key part of any outdoor installation. Without proper drainage, water can collect around the stairs, leading to erosion, shifting, or damage over time.

Contractors take steps to:

  • Direct water away from the structure
  • Ensure proper slope and runoff
  • Prevent pooling around the base

This is especially important in North Jersey, where heavy rain and snowmelt can put added stress on outdoor features.

Step 7: Finishing Touches and Detailing

Once the main structure is complete, the final details bring the project together. This may include trimming edges, refining joints, and adding any additional features selected during the design phase.

Common finishing elements include:

  • Side walls or stone borders
  • Sealants (if needed)
  • Railings for safety
  • Integration with walkways or patios

These details enhance both the appearance and functionality of the finished stairs.

Step 8: Cleanup and Final Walkthrough

After installation is complete, the crew cleans up the work area, removes leftover materials, and ensures the property is left in good condition.

A final walkthrough allows homeowners to:

  • Review the completed work
  • Ask questions about maintenance
  • Understand any warranty details

This step ensures everything meets expectations before the project is officially finished.

What Homeowners Should Expect During the Project

Bluestone stair installation is a hands-on process that involves equipment, materials, and skilled labor. Homeowners should expect some temporary disruption, including noise and activity around the property.

However, most projects are completed efficiently when properly planned. Clear communication with your contractor helps keep everything on schedule and ensures a positive experience.

Choosing the Right Professionals

The success of your project depends heavily on who you hire. Experienced contractors understand how to handle local soil conditions, weather challenges, and proper installation techniques.

When evaluating bluestone stairs installers in North Jersey, look for:

A well-installed staircase should not only look impressive but also perform reliably for years.

A Process That Delivers Long-Term Results

From initial planning to final installation, each step in the process plays a role in the outcome. Bluestone stairs are not just a decorative feature-they are a structural element that requires careful design and expert execution.

For homeowners searching for bluestone stairs installers near me, understanding this process helps set realistic expectations and ensures you’re investing in quality work that enhances your home for the long term.

If you want a deeper explanation, you can check out this Top Bluestone Stairs Installation Service in North Jersey

OK.com, the global platform transforming how people connect with essential services, announced its official launch in the United States. The platform brings together jobs, housing, vehicle sales, and marketplace services in one integrated experience, powered by cutting-edge AI technology and available completely free for a limited time.

Built for modern local living, OK.com combines technological innovation with community-focused design to create smarter connections between Americans. The platform already serves users across nine countries including the United Kingdom and Australia, bringing global expertise to local communities.

“Many Americans struggle with fragmented online experiences when managing life’s essential needs,” noted a platform representative. “OK.com eliminates the need to juggle multiple specialized apps by providing a unified solution that actually understands user needs through intelligent technology.”

Comprehensive Service Categories:

The platform’s job section represents a significant advancement in recruitment technology. Featuring AI-Powered Candidate Matching, the system analyzes employer requirements to deliver precision matches, saving businesses considerable time in the hiring process. The platform facilitates Direct Hiring through integrated Instant Messaging, creating seamless communication channels. For today’s diverse workforce, Global Localization supports multilingual resumes and localized formats. Enterprise-grade Data Security & Compliance ensures all interactions meet GDPR standards, while Smart Analytics provide real-time insights for recruitment optimization. The platform hosts extensive listings ranging from student positions and blue-collar opportunities to executive roles.

OK.com‘s marketplace section simplifies buying and selling with quick listing capabilities that connect users with a broad network of local buyers. The platform accommodates everything from household items and electronics to collectibles. Transactions are protected through a secure Escrow system, while verified seller profiles and review systems maintain community Trust & Safety.

Vehicle seekers will appreciate the platform’s Extensive Inventory from reputable sellers, covering almost all makes, models, and price points. Transparent History reports provide third-party verification and maintenance records, giving buyers confidence in their purchases. AI Matching technology helps users identify ideal vehicles based on their preferences, while Advanced Filters enable precise searching by specifications and budget.

The housing section offers Extensive Listings of verified properties nationwide. AI Recommendations deliver personalized property matches, while Virtual Viewing options enable remote tours through HD video. Powerful Search Tools incorporating map-based interfaces and market trends empower users to make informed decisions.

Early users report positive experiences with the platform’s integrated approach. One New York-based user mentioned, “The ability to handle multiple needs in one place without constantly switching between apps makes everything so much simpler.”

OK.com is now available to all users across the United States. Experience the future of local connections at ok.com.

Home renovations and construction projects are significant investments that require expertise, coordination, and compliance with local regulations. While some homeowners consider managing projects on their own to cut costs, the risks often outweigh the savings. Working with a licensed BuildRex general contractor provides professional oversight, financial protection, and guaranteed quality — all critical for a successful outcome.

Professional Expertise and Experience

Licensed contractors bring years of training and experience in construction management. They understand structural design, local building codes, and safe work practices. This expertise helps them anticipate potential challenges and find efficient solutions before issues become costly.

From foundation work to roofing, they coordinate all aspects of your project to maintain consistent quality. Their technical knowledge ensures that every phase of construction meets both safety standards and aesthetic expectations.

Compliance with Building Codes and Permits

One of the biggest advantages of hiring a licensed contractor is code compliance. Every city has specific regulations for electrical, plumbing, and structural work. A licensed professional knows these laws and ensures all permits are secured before work begins.

Unpermitted work can lead to fines, delays, or even forced demolition in severe cases. A licensed contractor eliminates that risk by handling inspections, approvals, and documentation properly.

Financial and Legal Protection

Licensed contractors carry liability insurance and workers’ compensation coverage, protecting homeowners from unexpected financial responsibility. If an accident or property damage occurs during construction, insurance covers the loss — not you.

Without this protection, you could face substantial out-of-pocket expenses or even legal complications. Hiring a licensed contractor ensures peace of mind through proper coverage and accountability.

Reliable Network of Skilled Subcontractors

Experienced contractors maintain long-term relationships with qualified subcontractors — electricians, plumbers, carpenters, and painters — who meet industry standards. This network allows them to assemble a dependable team quickly, ensuring work progresses smoothly and efficiently.

By leveraging trusted professionals, they maintain consistency, reduce delays, and uphold craftsmanship across all stages of your project.

Efficient Project Management

Large renovation projects involve dozens of moving parts — schedules, deliveries, budgets, and inspections. A licensed contractor handles all of it, keeping timelines realistic and budgets controlled.

They coordinate multiple trades, monitor progress, and address challenges immediately. This centralized management minimizes confusion and ensures that deadlines are met without compromising quality.

Quality Assurance and Accountability

A licensed contractor’s reputation depends on compliance, quality, and customer satisfaction. They must meet state and municipal standards to retain their license, which encourages higher professionalism and transparency.

They provide written contracts that define scope, payment terms, and warranty coverage. This level of accountability protects homeowners and ensures the project aligns with expectations from start to finish.

Cost Efficiency in the Long Run

While hiring a licensed contractor might appear more expensive upfront, it often saves money over time. Their experience helps prevent costly mistakes, material waste, and rework. They also have access to trade discounts on materials and equipment, reducing your overall expenses.

DIY or unlicensed work may seem cheaper initially but often leads to repairs, delays, and safety issues that increase long-term costs. A licensed contractor gets it right the first time.

Enhanced Property Value

Properly executed renovations improve not just aesthetics but also resale value. Homes renovated under licensed supervision meet official inspection standards, making them easier to sell and appraise at higher values.

Prospective buyers are more confident in properties with documented, code-compliant renovations — which boosts your return on investment.

Final Thoughts

Hiring a licensed contractor is about more than convenience — it’s about safeguarding your investment, ensuring safety, and guaranteeing professional results. From managing permits to coordinating teams and ensuring code compliance, a licensed BuildRex general contractor brings structure and reliability to every stage of your project.